记一次AI实践——CNN、RNN、NBM识别手写数据集

# 前言

没有编程能力,代码全靠找。找了非常久的代码,难得能用的。

我的TensorFlow是2.7.0版本的,亲测代码可用。

# 卷积神经网络

CNN代码出处:深度学习–TensorFlow(项目)识别自己的手写数字(基于CNN卷积神经网络)

CNN训练代码

 1
 2
 3
 4
 5
 6
 7
 8
 9
10
11
12
13
14
15
16
17
18
19
20
21
22
23
24
25
26
27
28
29
30
31
32
33
34
35
36
37
38
39
40
41
42
43
44
45
46
47
48
49
50
51
52
53
54
55
56
57
58
59
60
61
62
63
64
# CNN
import os
os.environ['TF_CPP_MIN_LOG_LEVEL'] = '2'
from tensorflow.keras.utils import to_categorical
from tensorflow.keras.datasets import mnist
from tensorflow.keras.models import Sequential
from tensorflow.keras.layers import Dense, Dropout, Convolution2D, MaxPooling2D, Flatten
from tensorflow.keras.optimizers import Adam

# 1、载入数据
(train_data, train_target), (test_data, test_target) = mnist.load_data()

# 2、改变数据维度
train_data = train_data.reshape(-1, 28, 28, 1)
test_data = test_data.reshape(-1, 28, 28, 1)
# 注:在TensorFlow中,在做卷积的时候需要把数据变成4维的格式
# 这4个维度分别是:数据数量,图片高度,图片宽度,图片通道数

# 3、归一化(有助于提升训练速度)
train_data = train_data / 255.0
test_data = test_data / 255.0

# 4、独热编码
train_target = to_categorical(train_target, num_classes=10)
test_target = to_categorical(test_target, num_classes=10)  # 10种结果

# 5、搭建CNN卷积神经网络
model = Sequential()
# 5-1、第一层:卷积层+池化层
# 第一个卷积层
model.add(
    Convolution2D(input_shape=(28, 28, 1), filters=32, kernel_size=5, strides=1, padding='same', activation='relu'))
#         卷积层         输入数据                  滤波器数量      卷积核大小        步长          填充数据(same padding)  激活函数
# 第一个池化层 # pool_size
model.add(MaxPooling2D(pool_size=2, strides=2, padding='same', ))
#         池化层(最大池化) 池化窗口大小   步长          填充方式

# 5-2、第二层:卷积层+池化层
# 第二个卷积层
model.add(Convolution2D(64, 5, strides=1, padding='same', activation='relu'))
# 64:滤波器个数      5:卷积窗口大小
# 第二个池化层
model.add(MaxPooling2D(2, 2, 'same'))

# 5-3、扁平化 (相当于把(64,7,7,64)数据->(64,7*7*64))
model.add(Flatten())

# 5-4、第三层:第一个全连接层
model.add(Dense(1024, activation='relu'))
model.add(Dropout(0.5))

# 5-5、第四层:第二个全连接层(输出层)
model.add(Dense(10, activation='softmax'))
# 10:输出神经元个数

# 6、编译
model.compile(optimizer=Adam(learning_rate=1e-4), loss='categorical_crossentropy', metrics=['accuracy'])
#            优化器(adam)               损失函数(交叉熵损失函数)            标签

# 7、训练
model.fit(train_data, train_target, batch_size=64, epochs=10, validation_data=(test_data, test_target))

# 8、保存模型
model.save('mnist.h5')

输出:

 1
 2
 3
 4
 5
 6
 7
 8
 9
10
11
12
13
14
15
16
17
18
19
20
21
22
23
Downloading data from https://storage.googleapis.com/tensorflow/tf-keras-datasets/mnist.npz
11493376/11490434 [==============================] - 0s 0us/step
11501568/11490434 [==============================] - 0s 0us/step
Epoch 1/10
938/938 [==============================] - 24s 11ms/step - loss: 0.3301 - accuracy: 0.9055 - val_loss: 0.0860 - val_accuracy: 0.9740
Epoch 2/10
938/938 [==============================] - 10s 10ms/step - loss: 0.0922 - accuracy: 0.9725 - val_loss: 0.0519 - val_accuracy: 0.9834
Epoch 3/10
938/938 [==============================] - 10s 10ms/step - loss: 0.0646 - accuracy: 0.9800 - val_loss: 0.0390 - val_accuracy: 0.9870
Epoch 4/10
938/938 [==============================] - 10s 10ms/step - loss: 0.0515 - accuracy: 0.9839 - val_loss: 0.0337 - val_accuracy: 0.9881
Epoch 5/10
938/938 [==============================] - 10s 11ms/step - loss: 0.0428 - accuracy: 0.9875 - val_loss: 0.0327 - val_accuracy: 0.9888
Epoch 6/10
938/938 [==============================] - 10s 10ms/step - loss: 0.0368 - accuracy: 0.9891 - val_loss: 0.0255 - val_accuracy: 0.9910
Epoch 7/10
938/938 [==============================] - 10s 11ms/step - loss: 0.0309 - accuracy: 0.9903 - val_loss: 0.0251 - val_accuracy: 0.9911
Epoch 8/10
938/938 [==============================] - 10s 11ms/step - loss: 0.0269 - accuracy: 0.9914 - val_loss: 0.0217 - val_accuracy: 0.9921
Epoch 9/10
938/938 [==============================] - 10s 11ms/step - loss: 0.0241 - accuracy: 0.9926 - val_loss: 0.0223 - val_accuracy: 0.9923
Epoch 10/10
938/938 [==============================] - 10s 11ms/step - loss: 0.0206 - accuracy: 0.9936 - val_loss: 0.0208 - val_accuracy: 0.9921

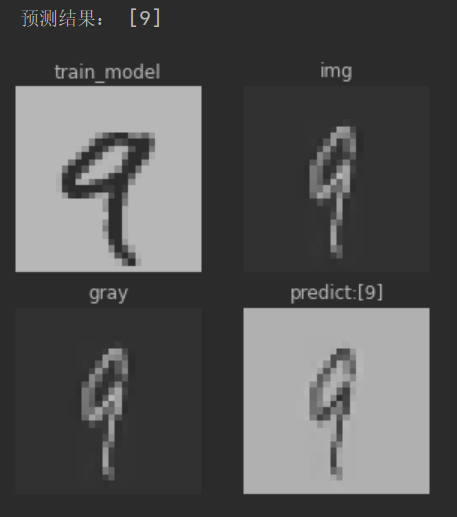
CNN识别代码

 1
 2
 3
 4
 5
 6
 7
 8
 9
10
11
12
13
14
15
16
17
18
19
20
21
22
23
24
25
26
27
28
29
30
31
32
33
34
35
36
37
38
39
40
41
42
43
44
45
46
47
48
49
50
51
52
53
54
55
56
import os
os.environ['TF_CPP_MIN_LOG_LEVEL']='2'

import tensorflow as tf
from tensorflow.keras.models import load_model
import matplotlib.pyplot as plt
from PIL import Image
import numpy as np

# 1、载入数据
mnist = tf.keras.datasets.mnist
(x_train, y_train), (x_test, y_test) = mnist.load_data()

# 2、载入训练好的模型
model = load_model('mnist.h5')

# 3、载入自己写的数字图片并设置大小
img = Image.open('C:/Users/shiro/dl/datas/6/1869-6.bmp')
# 设置大小(和数据集的图片一致)
img = img.resize((28, 28))

# 4、转灰度图
gray = np.array(img.convert('L'))       #.convert('L'):转灰度图

# 5、转黑底白字、数据归一化
gray_inv = (255-gray)/255.0

# 6、转四维数据(CNN预测需要)
image = gray_inv.reshape((1,28,28,1))

# 7、预测
prediction = model.predict(image)           # 预测
prediction = np.argmax(prediction,axis=1)   # 找出最大值
print('预测结果:', prediction)

# 8、显示
# 设置plt图表
f, ax = plt.subplots(2, 2, figsize=(5, 5))
# 显示数据集图像
ax[0][0].set_title('train_model')
ax[0][0].axis('off')
ax[0][0].imshow(x_train[18], 'gray')
# 显示原图
ax[0][1].set_title('img')
ax[0][1].axis('off')
ax[0][1].imshow(img, 'gray')
# 显示灰度图(白底黑字)
ax[1][0].set_title('gray')
ax[1][0].axis('off')
ax[1][0].imshow(gray, 'gray')
# 显示灰度图(黑底白字)
ax[1][1].set_title(f'predict:{prediction}')
ax[1][1].axis('off')
ax[1][1].imshow(gray_inv, 'gray')

plt.show()

预测结果:

CNN_Pre_Img
CNN_Pre_Img

# 循环神经网络

原项目地址:https://github.com/aymericdamien/TensorFlow-Examples 我这运行的时候有奇怪的Bug,遂添加了行代码。

  1
  2
  3
  4
  5
  6
  7
  8
  9
 10
 11
 12
 13
 14
 15
 16
 17
 18
 19
 20
 21
 22
 23
 24
 25
 26
 27
 28
 29
 30
 31
 32
 33
 34
 35
 36
 37
 38
 39
 40
 41
 42
 43
 44
 45
 46
 47
 48
 49
 50
 51
 52
 53
 54
 55
 56
 57
 58
 59
 60
 61
 62
 63
 64
 65
 66
 67
 68
 69
 70
 71
 72
 73
 74
 75
 76
 77
 78
 79
 80
 81
 82
 83
 84
 85
 86
 87
 88
 89
 90
 91
 92
 93
 94
 95
 96
 97
 98
 99
100
101
102
103
104
105
106
107
108
109
# RNN
from __future__ import absolute_import, division, print_function

# 导入TensorFlow v2.
import tensorflow as tf
from tensorflow.keras import Model, layers
import numpy as np
tf.compat.v1.enable_eager_execution() # 自己添加的

# MNIST 数据集参数
num_classes = 10 # 所有类别(数字 0-9)
num_features = 784 # 数据特征 (图像形状: 28*28)

# 训练参数
learning_rate = 0.001
training_steps = 1000
batch_size = 32
display_step = 100

# 网络参数
# MNIST的图像形状为28 * 28px,因此我们将为每个样本处理28个时间步长的28个序列。
num_input = 28 # 序列数
timesteps = 28 # 时间步长
num_units = 32 # LSTM层神经元数目

# 准备MNIST数据
from tensorflow.keras.datasets import mnist
(x_train, y_train), (x_test, y_test) = mnist.load_data()
# 转化为float32
x_train, x_test = np.array(x_train, np.float32), np.array(x_test, np.float32)
# 将图像展平为784个特征的一维向量(28*28)。
x_train, x_test = x_train.reshape([-1, 28, 28]), x_test.reshape([-1, num_features])
# 将图像值从[0,255]归一化到[0,1]
x_train, x_test = x_train / 255., x_test / 255.

# 使用tf.data API对数据进行随机排序和批处理
train_data = tf.data.Dataset.from_tensor_slices((x_train, y_train))
train_data = train_data.repeat().shuffle(5000).batch(batch_size).prefetch(1)

# 创建LSTM模型
class LSTM(Model):
    # 创建TF模型
    def __init__(self):
        super(LSTM, self).__init__()
        # RNN (LSTM) 隐含层
        self.lstm_layer = layers.LSTM(units=num_units)
        self.out = layers.Dense(num_classes)

    # 前向传播
    def call(self, x, is_training=False):
        # LSTM层
        x = self.lstm_layer(x)
        # 输出层 (num_classes).
        x = self.out(x)
        if not is_training:
            # tf 交叉熵接收没有经过softmax的概率输出,所以只有不是训练时才应用softmax
            x = tf.nn.softmax(x)
        return x

# 创建LSTM模型
lstm_net = LSTM()

# 交叉熵损失
# 注意,这将对概率输出应用'softmax'
def cross_entropy_loss(x, y):
    # 将标签转换为int 64 作为tf交叉熵函数的输入
    y = tf.cast(y, tf.int64)
    # 对概率输出应用softmax并计算交叉熵
    loss = tf.nn.sparse_softmax_cross_entropy_with_logits(labels=y, logits=x)
    # 批中的平均损失
    return tf.reduce_mean(loss)

# 准确率评估
def accuracy(y_pred, y_true):
    # 预测类是预测向量(即argmax)分数最高的分量下标
    correct_prediction = tf.equal(tf.argmax(y_pred, 1), tf.cast(y_true, tf.int64))
    return tf.reduce_mean(tf.cast(correct_prediction, tf.float32), axis=-1)

# Adam 优化器
optimizer = tf.optimizers.Adam(learning_rate)

# 优化过程
def run_optimization(x, y):
    # 将计算封装在GradientTape中以实现自动微分
    with tf.GradientTape() as g:
        # 前向传播
        pred = lstm_net(x, is_training=True)
        # 计算损失
        loss = cross_entropy_loss(pred, y)

    # 要更新的变量,即可训练变量
    trainable_variables = lstm_net.trainable_variables

    # 计算梯度
    gradients = g.gradient(loss, trainable_variables)

    # 按gradients更新 W 和 b
    optimizer.apply_gradients(zip(gradients, trainable_variables))

# 针对给定步骤数进行训练
for step, (batch_x, batch_y) in enumerate(train_data.take(training_steps), 1):
    # 运行优化过程以更新W和b值
    run_optimization(batch_x, batch_y)

    if step % display_step == 0:
        pred = lstm_net(batch_x, is_training=True)
        loss = cross_entropy_loss(pred, batch_y)
        acc = accuracy(pred, batch_y)
        print("step: %i, loss: %f, accuracy: %f" % (step, loss, acc))

# 朴素贝叶斯分类

代码出处:统计学习方法与Python实现(三)——朴素贝叶斯法 在原版的基础上修改了引入数据集的位置,改为keras中的mnist数据集。

 1
 2
 3
 4
 5
 6
 7
 8
 9
10
11
12
13
14
15
16
17
18
19
20
21
22
23
24
25
26
27
28
29
30
31
32
33
34
35
36
37
38
39
40
41
42
43
44
45
46
47
48
49
50
51
52
53
54
55
56
57
58
59
60
61
62
63
64
65
66
67
68
69
70
71
72
73
74
75
76
77
78
79
80
81
82
83
84
85
86
87
88
# 朴素贝叶斯
from tensorflow.keras.datasets import mnist
import numpy as np

(train_data, train_label), (test_data, test_label) = mnist.load_data()

# 训练集和测试集大小
train_length = 60000
test_length = 10000
size = 28 * 28      # 输入特征向量长度
data_kind = 10      # 分为几类
choice = 2          # 每个向量有几种取值
lam = 1             # 贝叶斯估计中的lamda

# 预处理数据
train_data = train_data[:train_length].reshape(train_length, size)
# 数据二值化
np.place(train_data, train_data > 0, 1)
train_label = np.array(train_label, dtype='int8')
train_label = train_label[:train_length].reshape(train_length, )

test_data = test_data[:test_length].reshape(test_length, size)
np.place(test_data, test_data > 0, 1)   # 数据二值化
test_label = np.array(test_label, dtype='int8')
test_label = test_label[:test_length].reshape(test_length, )

# 初始化数组记录条件概率和先验概率
P_con = np.zeros([data_kind, size, choice])
P_pre = np.zeros(data_kind)


# 计算先验概率
def compute_P_pre(label, P_init, lamda=1):

    pre = P_init
    for la in label:
        pre[int(la)] += 1

    pre += lamda

    return pre / (label.shape[0] + pre.shape[0] * lamda)


# 计算条件概率
def compute_P_con(data, label, P_init, lamda=1):

    con = P_init
    summ = np.zeros(P_init.shape[0])
    for index, value in enumerate(data):
        for jndex, dalue in enumerate(value):
            con[int(label[index]), jndex, int(dalue)] += 1
        summ[int(label[index])] += 1

    con += lamda
    summ += lamda * 2

    for index, value in enumerate(con):
        con[index] /= summ[index]

    return con


# 进行测试
def Bayes_divide(pre, con, test, label):

    acc = 0
    ans = np.full(test.shape[0], -1)
    P_div = np.ones([test.shape[0], pre.shape[0]])
    for index, value in enumerate(test):
        for times in range(pre.shape[0]):
            for jndex, dalue in enumerate(value):
                P_div[index, times] *= con[times, jndex, int(dalue)]
            P_div[index, times] *= pre[times]

    for index, temp in enumerate(P_div):
        ans[index] = temp.argmax()
        if ans[index] == label[index]:
            acc += 1

    return acc / label.shape[0], ans


P_pre = compute_P_pre(train_label, P_pre, lamda=lam)
P_con = compute_P_con(train_data, train_label, P_con, lamda=lam)
acc, ans = Bayes_divide(P_pre, P_con, test_data, test_label)
print('acc', acc)

# 最后的生成模型代码我没有添加

输出:

1
acc 0.8413
使用 Hugo 构建
主题 StackJimmy 设计